
Gear
How to Build a Survival Shelter in the Wild: 6 Designs That Actually Keep You Dry
Key takeaways
- Shelter beats fire in cold-wet conditions; you can survive cold, not prolonged wet cold.
- Insulation from the ground matters more than the roof in most survival situations.
- A debris hut works only if the debris layer is genuinely thick — thin is worse than nothing.
- Build the smallest shelter that fits you; every extra cubic meter is air you must heat.
If you are cold and wet and the light is going, shelter matters more than fire, more than food and more than water. Hypothermia kills people in conditions that would not trouble them if they were dry, and the fastest way to stop losing heat is to get out of the wind and the rain. The good news is that a serviceable shelter does not require a tent, a tarp or any specialised equipment. It requires knowing a handful of shapes, understanding what each one is good at, and being willing to spend two hours of daylight building something that looks far too large.
Why shelter comes before fire and water
Survival priorities are taught in different orders by different schools, but they converge on the same physics. You can survive weeks without food and days without water. You can die of hypothermia in a single night at temperatures that would be merely uncomfortable indoors, and wetness accelerates that process dramatically by destroying the insulating value of every layer you wear.
This is why the first hour of an unplanned night outdoors should go into shelter rather than into a fire. Building a fire in the wet is slow, often unsuccessful, and competes for the same daylight you need for the shelter. Once you are under cover and insulated from the ground, you can attempt fire from a position of relative safety. Reverse the order and you risk spending the last of the light on a fire that goes out, leaving you to build shelter in the dark.
The other reason shelter comes first is that it keeps working while you sleep. A fire requires constant attention and fuel; a shelter does not. If you are going to be unconscious for eight hours, the thing that protects you during those hours is the priority.
Choosing a site before you build anything
Site selection determines whether your shelter works, and it takes five minutes. Walk the area and look for four things in order: drainage, wind protection, overhead hazards and material availability.
Drainage first. Never build in a dry riverbed, however tempting the flat gravel looks, and never in a hollow where cold air and water collect. Look for a slight rise or a naturally convex surface. Cold air flows downhill at night and pools in depressions, which means a hollow can be several degrees colder than a slope a hundred metres away.
Wind protection second. A natural windbreak — a rock outcrop, a dense stand of trees, the leeward side of a ridge — reduces the heat you lose by convection more effectively than any amount of extra insulation. Position your shelter so the windbreak blocks the prevailing wind, but never directly beneath a cliff where rockfall is possible.
Overhead hazards third. Dead standing trees, branches hanging without foliage, and the base of any steep loose slope are all places people get hurt. This is the check most people skip because they have already decided the spot looks good, and it is the one that causes the most serious injuries.
Material availability last. A debris hut needs a deep, dry litter layer. A lean-to needs long straight poles and plenty of fill. If the material is not there, pick a different shelter design rather than compromising the one you have in mind.
Design one: the lean-to
The lean-to is the fastest substantial shelter you can build with no tools. Drive or wedge a horizontal ridgepole between two supports — a tree fork, two uprights lashed together, or a rock ledge — at roughly waist to shoulder height. Lean a row of long poles against it at about a forty-five degree angle, spaced close enough that the fill material will not fall through. Then cover the poles with whatever you have: boughs, bark, leafy branches, bracken, or a tarp if you are carrying one.
Start the covering at the bottom and overlap upward like roof tiles, so water sheds down the outside rather than running into the shelter. This is the step almost everyone gets backwards on the first attempt. A lean-to covered from the top down funnels every drop of rain directly onto the person underneath it.
The lean-to's weakness is that it is open on one side and open-ended. Face the opening away from the wind and build a reflector fire in front of it, which turns the open side into an asset: the fire warms you directly and reflects heat off a rock or log wall placed behind it. In calm, dry conditions a well-built lean-to is genuinely comfortable. In driving wind it is not, and you should choose a different design.
Design two: the debris hut
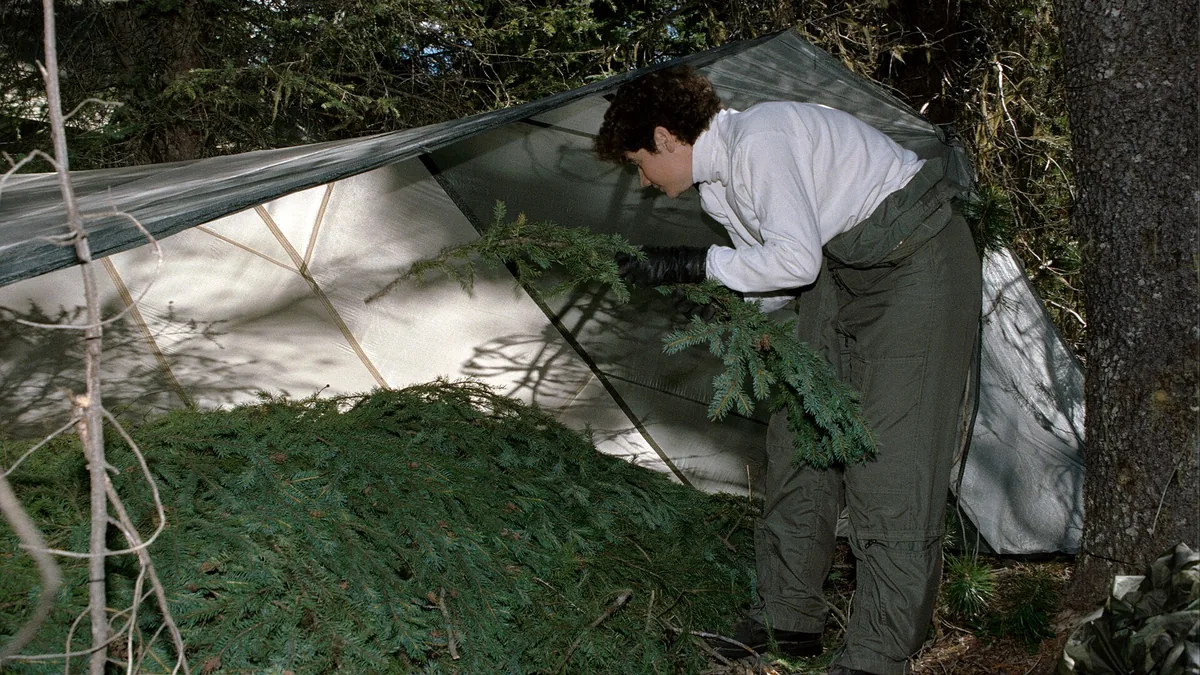
The debris hut is the classic wilderness shelter because it uses the best insulator available in most forests: dead, dry vegetation. Build a ridgepole as for a lean-to but lower, around hip height. Lean ribs against it from both sides to form an A-frame. Then pile loose debris — leaves, pine needles, grass, bracken — over the frame.
The critical number is thickness. A debris roof needs to be at least sixty centimetres, and closer to a metre in cold conditions, after it has compressed under its own weight. A thin layer of leaves is worse than no shelter at all, because it gives you false confidence while providing almost no insulation. Build it far larger and thicker than feels necessary, then add more.
Make the interior small. The hut should be just long enough to lie down in and just high enough to sit up inside. Every extra cubic metre is air your body has to heat, and a hut built for standing is a hut that stays cold. Crawl in feet first, and stuff the entrance with a bundle of debris once you are inside.
Before you commit, test the material. Grab a handful of the litter layer and squeeze it. If it is damp, keep looking — damp debris compacts, loses its insulating value and can leave you colder than an open shelter would. Dry material at the surface over damp material underneath is common; scrape the wet layer aside to reach what is dry below.
Design three: tarp configurations
A lightweight tarp is the single most versatile shelter item you can carry, because it converts into six or seven different shapes depending on conditions. Learning three configurations covers almost everything.
The A-frame is the general-purpose pitch. Run a ridgeline between two trees, drape the tarp over it, and stake the four corners out to the ground. It sheds rain well, gives headroom down the centre, and can be closed at one end with a stuffed pack or a pile of debris. It is open to wind along the length, so orient the ridge into the wind rather than across it.
The lean-to pitch uses one edge of the tarp on the ground and the opposite edge elevated, angled away from the wind. It blocks wind better than an A-frame and reflects fire heat well, but gives less protected volume. Use it when wind is the dominant problem and rain is not.
The plough-point or half-pyramid pitch uses one centre pole or tree at the front and the tarp swept back to a low rear edge pegged to the ground. It is fast, uses one anchor point, and handles wind and rain from a known direction extremely well. It is the configuration to default to in bad weather on open ground, because its low profile presents very little to the wind.
In all three pitches, guyline tension matters more than the shape. A slack tarp flaps, stretches its fabric, and eventually tears its own attachment points. Tension evenly and check it after the first hour, because fabric always relaxes once it takes load.
Design four: snow shelters
Snow is an excellent insulator, which is counterintuitive given how cold it feels to touch. A snow shelter holds interior temperatures near freezing regardless of how far below freezing it is outside, because the snow blocks wind and traps body heat.
The simplest snow shelter is a trench. Find or dig a trench roughly a metre deep, wide enough to lie in and slightly longer than you are. Cover it with whatever you have — branches and snow blocks, skis, a tarp, or a snow block roof if the snow is cohesive enough to cut. Build a small entrance at one end and block it once inside. A trench shelter can be built in under two hours with a shovel or an improvised one, and it works in snow that is too loose for any other design.
A quinzhee is a hollowed pile of snow. Pile a large mound, at least two metres across and two metres high, then let it sinter — set and bond — for ninety minutes to two hours before digging. Sintering is what makes the roof stable; skip it and the shell collapses as you hollow it. Poke uniformly deep guide sticks into the surface before digging, then excavate until you reach the tip of each one, which gives you a consistent wall thickness of around thirty centimetres.
Always ventilate a snow shelter. Poke a pencil-thick hole through the roof and check it stays open. Carbon monoxide and carbon dioxide accumulation in a sealed snow cave is a real hazard, and the shelter's insulating value is exactly what makes it dangerous.
Design five: emergency and improvised options
When there is no time or no material, reduce the problem. A bivouac made from a large pile of dry leaves or grass, with your body buried in it up to the neck, provides surprising insulation for almost no effort. A natural shelter — a rock overhang, a hollow at the base of a large tree, a dense conifer with low branches — often needs only a windbreak added on the open side to be habitable.
An emergency bivvy sack or a heavy-duty rubbish bag is worth its weight many times over. It blocks wind completely, reflects radiant heat, and keeps your sleeping bag dry. If you have nothing else, sitting on an insulating pad inside a bag with your pack against your back and the opening drawn closed around your face will get you through a night that would otherwise be dangerous.
The principle in all improvised shelter is the same: block wind, shed water, insulate from the ground, and keep the volume small. Any arrangement that achieves those four things is a working shelter, regardless of how it looks.
The part everyone forgets: insulation underneath you
Conduction steals heat far faster than air does. Lying directly on cold ground pulls heat out of your body continuously, and no amount of roof overhead compensates for it. In any survival shelter, the layer between you and the ground is as important as the roof.
Build a bed before you finish the roof. Collect dry debris — leaves, grass, pine boughs — and pile it at least thirty centimetres deep, more if you can. Compress it slightly with your body and add more, because it will settle. If you have a pack, sleeping pad, foam mat or even a stuffed rucksack, put it under your torso rather than under your legs; the core is what you need to protect.
This applies inside a tent too. A camper on a thin mat on frozen ground will be colder than a camper on a thick debris bed under a tarp, regardless of which shelter looks more substantial.
Conclusion
Shelter is the skill that turns an unplanned night from an emergency into an uncomfortable story. Learn the lean-to and the debris hut, carry a tarp and a bivvy sack, and practice pitching in your garden in bad weather rather than on a hillside in worse. Choose the site for drainage and wind before you build anything. Insulate underneath you as carefully as you cover above you, and make the interior smaller than feels right. Do those things and the temperature outside stops being the thing that decides how your night goes.
Keep reading
The Best Tents for Wild Camping in 2026: 8 Shelters Tested in Real Weather
Compare the best wild camping tents of 2026 on weight, weather resistance and pack size. Real picks for solo trekkers, pairs and shoulder-season trips.

The Best Headlamps for Night Hiking and Camping in 2026
Lumens, beam pattern, battery life and red-light modes explained. Picks for the best hiking headlamps at every budget, with what actually matters.
What to Wear Winter Hiking: A Layering System That Works Below Freezing
Base, mid and shell layers explained for cold-weather hiking, plus what to wear on your feet, hands and head when temperatures drop below freezing.
